Audience Studio
Build high performing audiences for all your advertising channels.
Audience Builder Walkthrough Video
Deep-dive into the Audience Builder tool within the Untitled Platform.
Before you watch this video, ensure you’re familiar with the Untitled Platform by watching this overview.
Video Timestamps
0:30 Visitor Table record types
1:23 Source filters
1:38 Page path filters
2:24 Buyer Intent Model filters
2:48 Session data filters
3:00 B2C filters
4:02 B2B filters
4:33 Apply filters and save as an Audience
What are Audiences?
The Untitled Audience Builder allows you to classify and filter your resolved leads based on demographic and firmographic attributes and then save those filter settings to the Audience Library for ongoing use.
With the ability to apply advanced filters to lead lists, you can strategically sort leads based on specific requirements, leading to more targeted and effective campaigns. Save your filter settings as a new Audience for ongoing efficiency, and easily access and reuse each saved configuration.
Follow the step-by-step guide below to get started!
Creating Audiences
Log into Untitled
Log into Untitled and navigate to the Visitor Table page to view all available visitor data
Toggle between visitors based on file types: “B2B”, “B2C” or “PTE”:

In the table column titled Profile, select the View button on an individual result to review all the attributes on a single individual.
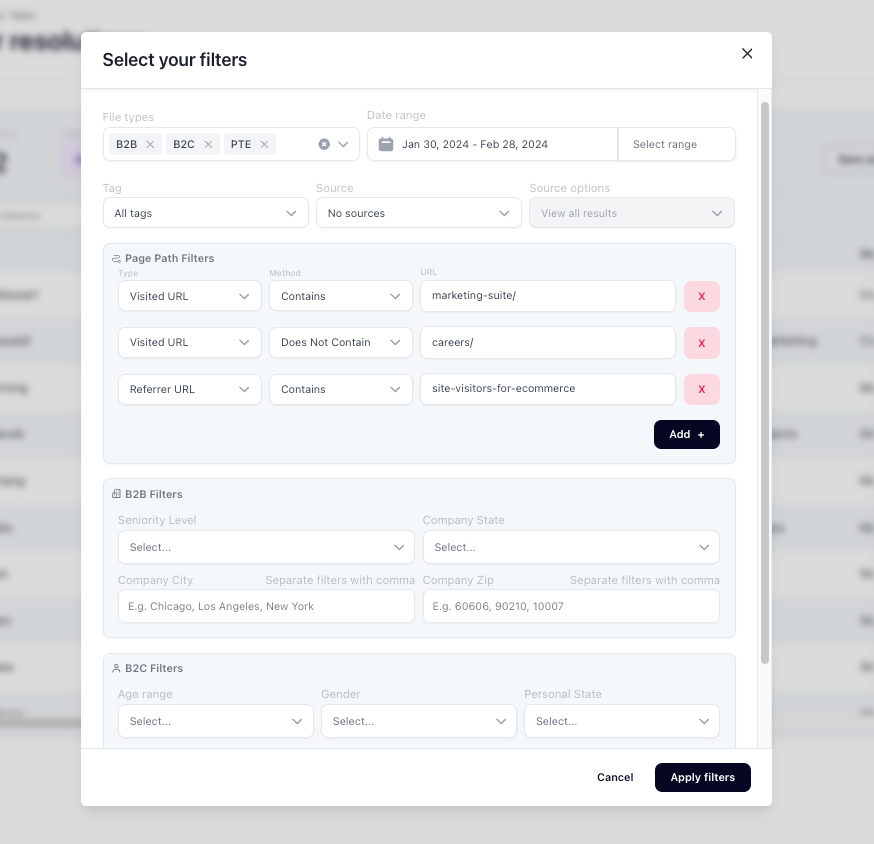
Use the Filter dropdown to view all available filter settings.
File types Filtering: Select which file types you would like to include in your audience. Options include B2B, B2C, and PTE.
Date Range Filtering: Build and sort audiences based on the specific date or period of time they visited your website.
Tag Filtering: If you have installed multiple Untitled ID Tags across different websites, you can select one or multiple tags to view and sort results.
Source Filtering: Connect your Shopify or Hubspot account to identify website visitors that currently match with an existing customer ID in these applications. Exclude matches to view net new leads or only include matches to build lists for targeting repeat customers.
Page Path Filters: To filter your audience based on the pages viewed while on your website, apply the following conditions to your filter settings:
Type dropdown:
Visited URL: select to filter based on all the pages a visitor hit when on your website
Referrer URL: select to filter based on the site or URL the visitor hit prior to landing on your website
Method dropdown:
Contains: select to filter results based on any unique section of a URL
Does not contain: select to exclude visitors who landed on a specific page, such as the careers page
Equals: select to filter visitors based on an exact URL
URL input box:
To filter visitors by the selected page path conditions, copy and paste a unique section of that page URL in the input box, e.g. “/products/shoes”.
Select Add + to apply additional URL conditions to the results
Seniority Level Filtering for B2B: Build your B2B audiences based on specific seniority levels.
Company State, City, and Zip Code for B2B: Build your B2B audience based on location data.
Age Range Filtering for B2C: Customize your B2C audience by filtering leads based on age ranges.
Gender Filtering for B2C: Segment your B2C lists based on gender.
Personal State, City, and Zip Code for B2C: Build your B2C audience based on location data.

Once you have selected all desired filters, click “Apply filters” to generate your new audience.
You can now either save the current filter settings to the Audience Library or Export lists as a csv.
Save Filter Settings as a New Audience
To save filter settings for repeated use, select the Save as audience button in the top right side of the table.

You will be prompted to name your new audience and give it a Lookback Window
The lookback window determines how long website visitors will remain in this Audience after a website session. Visitors can always re-enter an Audience if they reach the filter criteria again on their next website visit. If you'd like to create an Audience that never loses never loses members, select "All-Time".
Read our documentation about how to strategically use Lookback Windows for your online marketing efforts.

Once saved, you can either Export your audience for immediate use or visit the Audience Library to view all saved lists.
Managing your Audience Library
Build and save unlimited audiences to your library to access and reuse. Multiple team members can access saved audiences, ensuring that everyone is working with the same set of filters and criteria. All of your team’s saved audiences can be found under the Audiences page in the left navigation menu.
Saving audiences allows you to avoid recreating filters and configurations each time you need to target a specific group of leads. Saved audiences can also serve as a historical record of past campaigns, making it easier to track changes in audience criteria over time.
To access a saved Audience, select the View button. The "Summary" Tab will show the filters applied to create that Audience.

View Your Audiences
You can edit the Lookback Window for an Audience if you'd like to expand or restrict how long a website visitor remains in the Audience.

Edit the Lookback Window for Audiences to expand or restrict them.
Congratulations! You have now successfully built and saved your first audience to the Audience Library. You can now explore, build, and manage your resolution data with greater precision and efficiency and start activating to your connected destinations.
Need Further Support or Have Additional Questions?
Check out our FAQs to get some answers, start a chat on our website, or get connected directly with our team here.
Last updated
Was this helpful?